Go back to the homepage
Style Transfer w/ Color Preservation on Mr. Bland
We used a Style Transfer method to create a portrait of Mr. Bland.
Project Goals and Summary:
For our color preservation project, we decided to branch out and undertake several tasks. Our original idea was to add a color-preservation component to the fast-style-transfer repo we studied at the beginning of our project. We wanted to use the style of portraits of past headmasters of Milton to create new portraits for the current head of school, Mr. Bland.
However, as we worked on these tasks, we ran into a few problems that changed our project along the way. We found some difficulty connecting remotely to the computer in the programming lab and staying connected to the computer. As a result, we’ve created a manual that current and future programmers can use. We’ve outlined how to connect to the AI machine (with PuTTY for PC and with the terminal for mac), how to use Cyberduck to add/remove/download/view files on the computer, and how to continue a process offline with Tmux.
Additionally, since we were unable to successfully add a color-preservation component to the fast-style-transfer, we used anishathalye's repo to create the portraits of Mr. Bland. Instead, we’ve researched and reported on how color-preservation works both on a technical level and in layman's terms. We see the latter explanation as an opportunity to broadcast some of the work Milton programmers do to a wider audience. Also, in creating these images, we also learned a lot about how different variables, like iteration number or the shadows in a picture, impact our desired result.
Connecting/Accessing Files Remotely Manual:
We also wrote a full manual on how to smoothly connect to a machine (using PuTTY, Cyberduck, and running Tmux) so that future groups don't get stuck where we did.
The Process
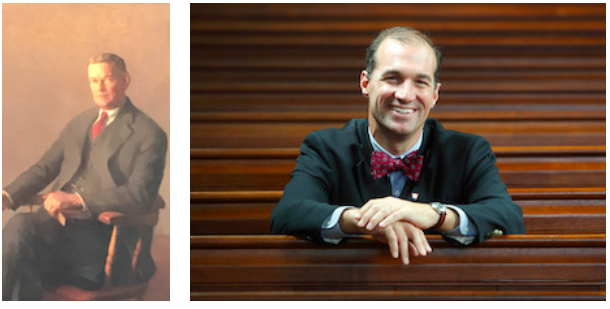
With our primary goal to give Mr. Bland his own portrait, we found a portrait of a previous headmaster, William Lusk, to stylize a picture of Mr. Bland in the Chapel that somewhat mimicked the style portrait. The two images below are what we trained initially:

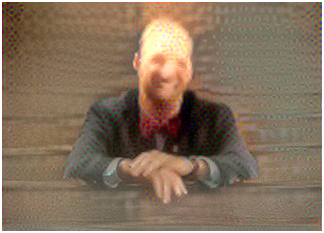
The result was blurred and no features were well defined. In addition, the color was not preserved very well. The mahogany brown background of the content image was dulled down. And none of Mr. Bland’s facial features were retained. This style transfer was not meeting any of our goals, and this poor result was likely due, in part, to the lack of “style” of the initial painting itself. It has only a basic background, and the portrait itself is lifelike; no distinct artists’ style could be drawn. The result can be seen below:

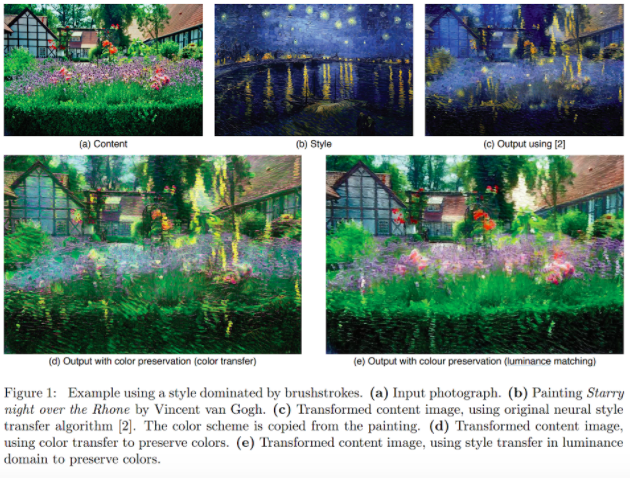
In addition to the problem with the style, the content was part of the problem. The image, perhaps due to its lack of contrast and light coloring, even with a distinct style like Starry Night, one of the most common style transfer styles, still produced a non-defined content transfer at 25 thousand iterations:

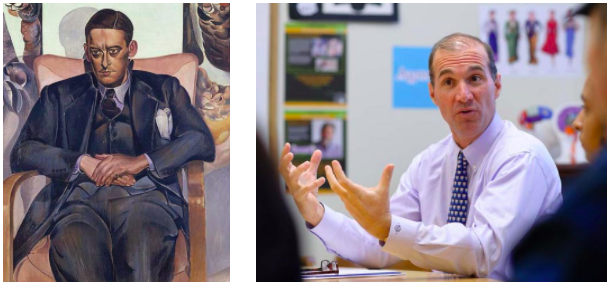
So, to try something new for the goal of our desired result, we tried a new content and a new style. We abandoned the Lusk portrait and the chapel picture and tried a picture of Mr. Bland in the classroom as it had brighter lighting. We thought the dark lighting and dark background that also matched the dark background of the style might have hindered the appropriate color-preserved style transfer. So we decided, sans another portrait of a headmaster, to try another Milton legend, and perhaps its most famous, T.S. Eliot. These photos were the two new style and then content images, respectively:

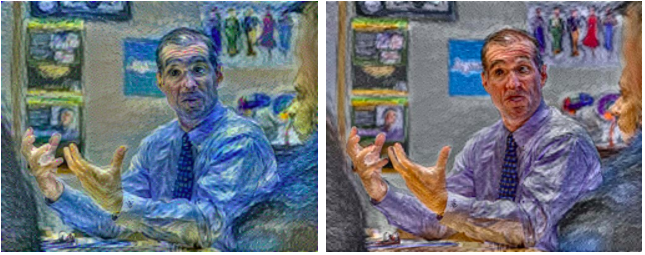
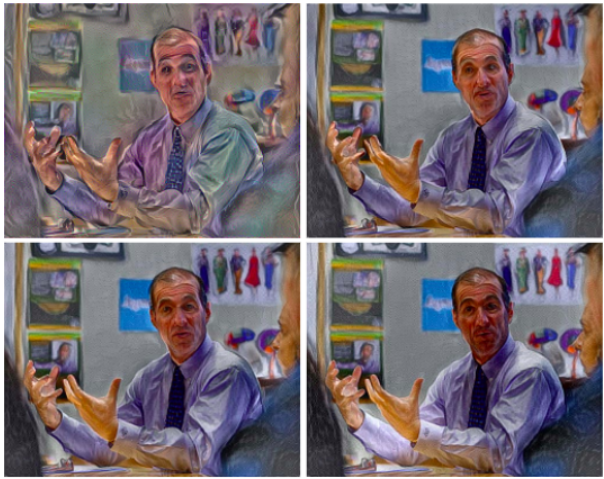
The results of this style transfer were much more promising. Given that the program runs 100 iterations in about one minute, we tried various iteration numbers with a GeForce 1060 GPU. The results were below, from left-to-right top-to-bottom, at 100, 500, 1000, 25000 iterations -- all with color preserved. At 25,000 iterations, the shadows start to become prevalent again and the facial structure becomes clearer. These shadows make the face look darker, and thus indicates that the color is not being preserved as well. And when looking at the green on the wall, the more iterations seemed to dilute the preservation of color -- while the features of the face became more defined.

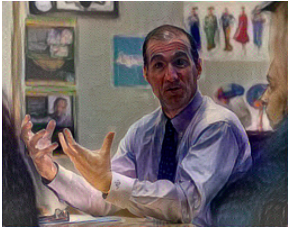
At 25,000 iterations without color preservation, the result, as a whole, was darker. The green in the background was darkened and the shadowing on Mr. Bland’s face was more pronounced, and, thus, his features are less defined.

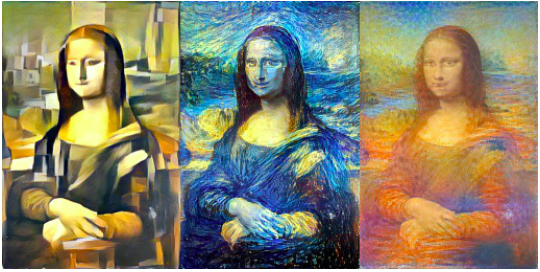
As a control, to make sure the color preservation of this repo was working distinctly and accurately, we tested the same content image with Starry Night -- with and without color preservation. The sans-color-preserved result had the starry blue across the image, while the color-preserved result had the same style across the image with color distinctly preserved (at 1000 iterations):

Results in Detailed Terms
Given the style image (S), and the content image (C), the style image’s colors are transformed linearly to match the colors of the content image. This produces a new style image S’ that replaces S as the input to the neural style transfer algorithm. Here we’ll look at how two different methods work .

There’s a few solutions for A that satisfy these requirements. The first variant uses a really complex equation called Cholesky’s decomposition. However, through many repetitions, this paper found that the results weren’t very visually appealing. Instead, the second variant uses the color matching formula in this paper on Image Analogies.
This is the general idea of Image Analogies:

This color matching formula essentially tries to estimate the most suitable pixels in A’ to use in the synthesis of B’. Here is how the paper describes the pseudo-code for this algorithm:

Luminance-only Transfer: Luminance is the intensity of light emitted from a surface per unit area in a given direction. Luminance can be computed in a number of ways; this method uses the Y channel from the YIQ color space, where the I and Q channels are “color difference” components. This approach is motivated by humans’ color-perception response: we are all much more sensitive to changes in the luminance channel than to changes in color difference channels. After processing in luminance space, we can recover the color simply by copying the I and Q channels of the input B image into the synthesized B’ image, followed by a conversion back to RGB. An added benefit of this approach is the speedup inherent in performing the matching and synthesis with one third as many color channels. The downside, however, is that color dependencies in the analogy filter are lost. Like the first method, the luminance channels LS and LC are first extracted from the style and content images. Then the neural style transfer algorithm is applied to these images to produce an output luminance image LT. If we let let µS and µC be the mean luminances of the two images, and σS and σC be their standard deviations, then each luminance pixel in the style image is updated as:
Here’s how these two methods compare visually:
Results in Layman's Terms
Neural Style Transfer is a process that takes the artistic style of one image and applies it over another image. There are two essential parts to this process: the “style image” (the image from which the artistic style is learned) and the “content image” (the image that gets the style applied to it). The end result is the content image reconstructed in a different style. The image below is a good example of this -- these are three Mona Lisa paintings in the style of Picasso, van Gogh, and Monet, respectively. (Source: here )

In these three, the content image used is the Mona Lisa, and the style images are famous paintings from their respective artists. As you can see, Style Transfer does a great job replicating each artist’s brush strokes and stylistic choices. However, the color in each style image is also transferred as part of the style -- the van Gogh-style Mona Lisa is a good example of this.
For our project, we wanted to preserve the color in the content image (a photo of Mr. Bland) to keep it recognizable. Thankfully, there are Style Transfer methods that can do exactly that. Thus, we used a Style Transfer method with color preservation for our final product, which is why the outcome looks very realistic in terms of color. In some of our first attempts, the outcome image looked extremely blurred because the Style Transfer method was preserving shadows on Mr. Bland, so we found a different picture that worked better with different styles applied to it.